How To Replace Whirlpool Duet Dryer Interface Control Board
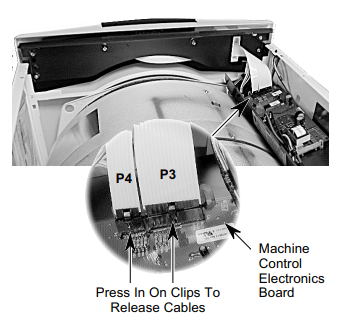
To Replace Whirlpool Duet Dryer Interface Control Board first unplug the dryer and move it out from the wall where you can get to the back of the dryer. Remove the dryer top cover. There are a few screws on the back side mounting the cover to the frame. Remove those and the top will slide forward and lift off. With the top off remove the three screws from the main control board bracket, and tip the bracket assembly inside the dryer and press in clips to disconnect the cables.
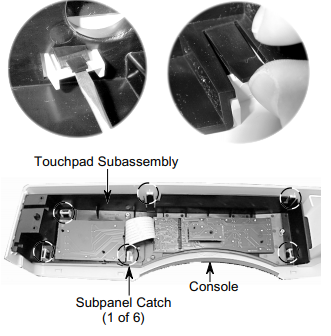
Remove the two console mounting bracket screws on the left and right side. Open the dryer door and pull out on the bottom of the console to release the interface locking tabs. Pull it out far enough the locking tabs are released from the left and right side flanges and lift up to remove the interface control console. With the console housing out place it on a flat soft surface with the control side facing down. Remove the 4 screws mounting the interface board in the console. Remove the selector knob then release the 6 locking tabs holding the interface board to the console.
With interface board removed, install the new board and reassemble the dryer. The replacement Whirlpool Dryer Interface Control Board can be ordered from the link below.
Click Here To Order The Interface Control Board
If you Have a question about this repair fill out the form and a certified appliance technician will answer your question usually within 24 hours. You will be notified by email once your question is answered. Questions not related to this repair will not be answered. Find the error you need help with in our database. If it's not in our database submit it on our code info request page.